

How to Choose the Right Strike Price for Covered Calls
The CC Strike Selection Blueprint

When you sell a covered call, you’re choosing a price at which you’d let your shares go.
That price is the strike.
Pick a strike too close, and a normal rally pulls your shares away.
You watch the stock keep climbing without you.
Pick a strike too far, and the premium is barely worth it.
You’ve tied up your shares for a month to collect $25.
Most people pick strikes by looking at the premium column and choosing the biggest number, but premium isn’t free. It’s what you get paid for capping your upside.
So the question isn’t “which strike pays the most?”
It’s “which strike pays me enough for the gains I’m agreeing to give up?”
This guide gives you a 5-step process to answer that — every time you sell a call.
Here’s what we’ll cover:
→ A 5-step process that takes any option chain and narrows it down to one or two strikes worth selling.
→ A full strike selection walkthrough with real numbers — so you can see exactly how each step works in practice.
→ A strike selection checklist you can use every time you sell a covered call.
→ And the three mistakes that cause most strike selection problems — so you can avoid them before they cost you.
Even if you’re a premium member using VADER’s daily covered call setups, this still matters.
You still need to understand why a setup works — so you can manage it calmly when the stock moves.
Following trades without understanding them is how people panic at the first sign of pressure.
So with this guide, I want to make sure that doesn’t happen.
Recently, I published the same framework for cash-secured puts.
If you missed it, that's a good companion to this one.

What the Strike Price Controls in a Covered Call
Before we get into the steps, let’s make sure we’re clear on what you’re choosing.
When you sell a covered call, you agree to sell 100 shares at a set price if the stock reaches that price by expiration.
That set price is the strike.
You pick the strike. And that one decision controls three things:
How much you get paid. Strikes closer to the current price pay more. Strikes further away pay less.
How much upside you keep. A higher strike lets the stock run further before your shares get called away. A lower strike caps your gains earlier.
How easy the trade is to manage. A strike too close to the price can get tested on any decent rally. Once the stock pushes through your strike, you’re either letting shares go or rolling under pressure — and rolling a deep in-the-money call is expensive.
The goal is a strike that pays you fairly for the upside you’re capping - without putting your shares at risk every time the stock has a good week.
That’s what the next five steps help you find.
Inside the full guide, I’ll walk you through the exact filters I use to narrow an option chain down to one or two strikes worth selling.
Step 1: Set Your Delta Rails
Delta is a number next to every strike in your option chain.
For covered calls, it tells you roughly how likely your shares are to get called away.
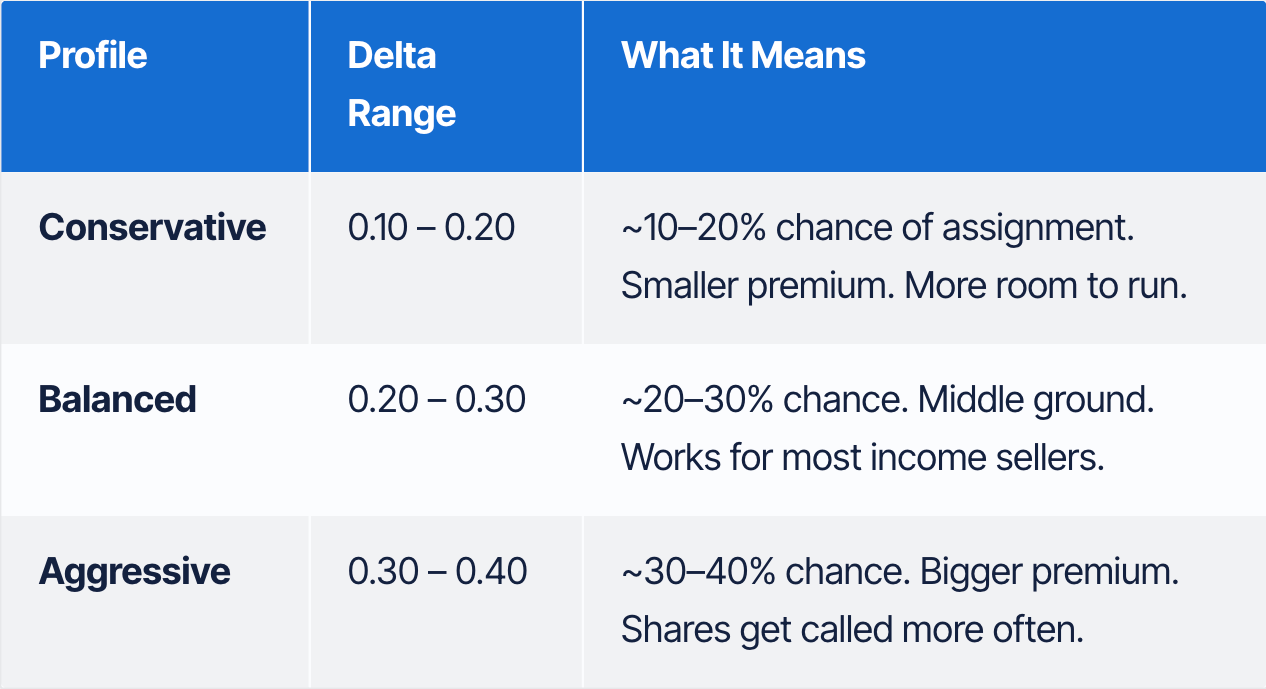
A delta of 0.20 means about a 20% chance the call ends up in the money at expiration. A delta of 0.35 means about 35%.
Higher delta = strike is closer to the current price = more premium, but higher chance you lose your shares.
Lower delta = strike is further away = less premium, but you’re more likely to keep your shares and ride further upside.
The “rails” are the range you stay inside based on what you’re comfortable with:
What to do:
Open your option chain. Find the delta column.
Cross out every strike outside your range. If you’re Balanced and a strike shows 0.38, skip it. If another shows 0.12, skip that too.
Only keep the strikes between your rails.
Step 2: Check the ATR Buffer
Delta tells you the probability of assignment.
ATR tells you whether that probability makes sense.
ATR stands for Average True Range.
It measures how much a stock actually moves per day - based on recent price action, not predictions.
A stock with a 14-day ATR of $4.00 moves about $4 per day on average.
Over a trading week, that’s roughly $20 of normal movement.
Here’s why this matters:
Delta is based on implied volatility - what the market expects.
But sometimes expectations and reality don’t match.
A stock might show a calm 0.20 delta, but if it’s been swinging $5 a day lately, that “safe” strike is closer than it looks.
ATR is your reality check.
The filter:
- Take the 14-day ATR and multiply by 1.5 to 2.
- Add that to the current stock price.
- If your strike is below that number, it’s inside normal noise - even if the delta looked fine.
Example:
Stock price: $180
ATR (14-day): $6.00
Buffer (1.5x): $9.00
Minimum strike: $189
A $185 strike might show a reasonable delta.
But with this stock’s recent movement, $185 is only one strong day away.
The ATR check flags that.
What to do:
After setting your delta rails in Step 1, run this filter on the strikes that remain. If any sit below your ATR buffer, treat them with caution - or skip them.
Step 3: Run the Yield Check
By now, you’ve filtered for delta and confirmed the strike has room to breathe.
Next question: Is the premium worth it?
A covered call locks up 100 shares until expiration.
That’s real commitment.
The premium you collect should justify it.
But here’s where covered calls differ from puts.
With a put, you’re getting paid to take risk - the risk of owning shares if the stock drops.
With a call, you’re getting paid to give something up - the upside beyond your strike.
So the question isn’t just “what’s my yield?”
It’s “what am I getting paid versus what I’m agreeing to give away?”
Two numbers to check:
1. Annualized yield
Take the premium, divide by the stock price, then annualize it based on days to expiration.
Formula: (Premium ÷ Stock Price) × (365 ÷ DTE) = Annualized Yield
Example:
Premium: $1.50
Stock price: $150
DTE: 30 days
($1.50 ÷ $150) × (365 ÷ 30) = 12.2% annualized
2. Upside you’re capping
How far is the strike from the current price?
Example:
Stock price: $150
Strike: $160
That’s $10 of upside - 6.7% - that you won’t participate in if the stock runs.
The tradeoff:
You’re collecting $1.50 (1% of share value) to give up any gains above $160 for the next 30 days.
Is that fair? Depends on your outlook and your goals.
But now you can see the tradeoff clearly instead of just chasing the highest premium.
What to do:
For each strike still on your list, calculate the annualized yield and the upside you’re capping. Make sure the tradeoff makes sense to you.
Step 4: Scan for Events
A strike can pass every filter and still blow up in your face.
The reason is usually something you could have checked in 30 seconds: an earnings date, an ex-dividend date, or a Fed meeting you forgot about.
Events move stocks in ways that ATR doesn’t capture.
A stock that drifts $3 a day can gap $20 overnight on an earnings surprise.
For covered calls, three events matter most:
1. Earnings
Stocks gap after earnings.
Sometimes 10%, sometimes 20%.
If your expiration lands after an earnings date, you’re exposed to a move that could blow past your strike before you can react.
Rule: Unless you specifically want earnings exposure, choose an expiration that falls before the next earnings date.
2. Ex-Dividend Dates
This one is call-specific.
If your call is in the money right before an ex-dividend date, the buyer might exercise early to capture the dividend. You wake up, and your shares are gone - not at expiration, but now.
It doesn’t happen every time.
But it happens enough that you should know when the ex-date is.
Rule: If your strike is near the money and ex-dividend is before expiration, expect early assignment risk.
3. Fed Meetings and Major Economic Releases
Interest rate decisions. Jobs reports. CPI prints.
These can swing the whole market in an afternoon.
Not every release matters.
But if one lands during your contract and you’re in rate-sensitive or high-beta names, know it’s there.
What to do:
Before selling any call, check three things:
— When is the next earnings date?
— When is the ex-dividend date?
— Any major macro events before expiration?If the answer to any of these makes you uncomfortable, pick a different expiration - or skip the trade.
Step 5: Check Liquidity
You’ve found a strike with the right delta, enough buffer, a fair yield, and no event landmines.
One more check: can you actually trade it cleanly?
Liquidity tells you how easy it is to get in and out at a fair price.
Low liquidity means wide spreads, bad fills, and expensive rolls if you need to adjust.
Two things to look at:
1. Bid-Ask Spread
This is the gap between what buyers are paying and what sellers are asking.
A tight spread - a few cents - means you can get filled close to the mid price.
A wide spread - $0.30, $0.50, or more - means you’re giving up real money on every entry and exit.
Rule: For most stocks, look for spreads under $0.10 to $0.15.
If the spread is a large percentage of the premium, the trade gets harder to win.
2. Open Interest
This is the number of contracts already open at that strike.
Higher open interest means more activity, tighter spreads, and easier fills.
Low open interest - single digits or low double digits - often signals a strike the market isn’t interested in.
Rule: Prefer strikes with open interest of at least a few hundred contracts. If open interest is thin, check the bid-ask spread extra carefully.
What to do:
Look at the strikes still on your list.
Check the bid-ask spread and open interest for each.
If a strike has a wide spread or thin open interest, move on — even if the delta and yield looked good.A trade that’s hard to enter and hard to adjust isn’t worth the trouble.
Example: Applying the 5 Strike Selection Filters
Let’s run through all five steps on one trade.
You own 100 shares of XYZ at $175.
You want to sell a covered call for income.
The option chain shows about a dozen strikes between $177.50 and $210.
Here’s how to narrow it down.
Step 1: Delta Rails
You’re a balanced income seller.
Your range is 0.20 to 0.30 delta.
You scan the chain and note the deltas:
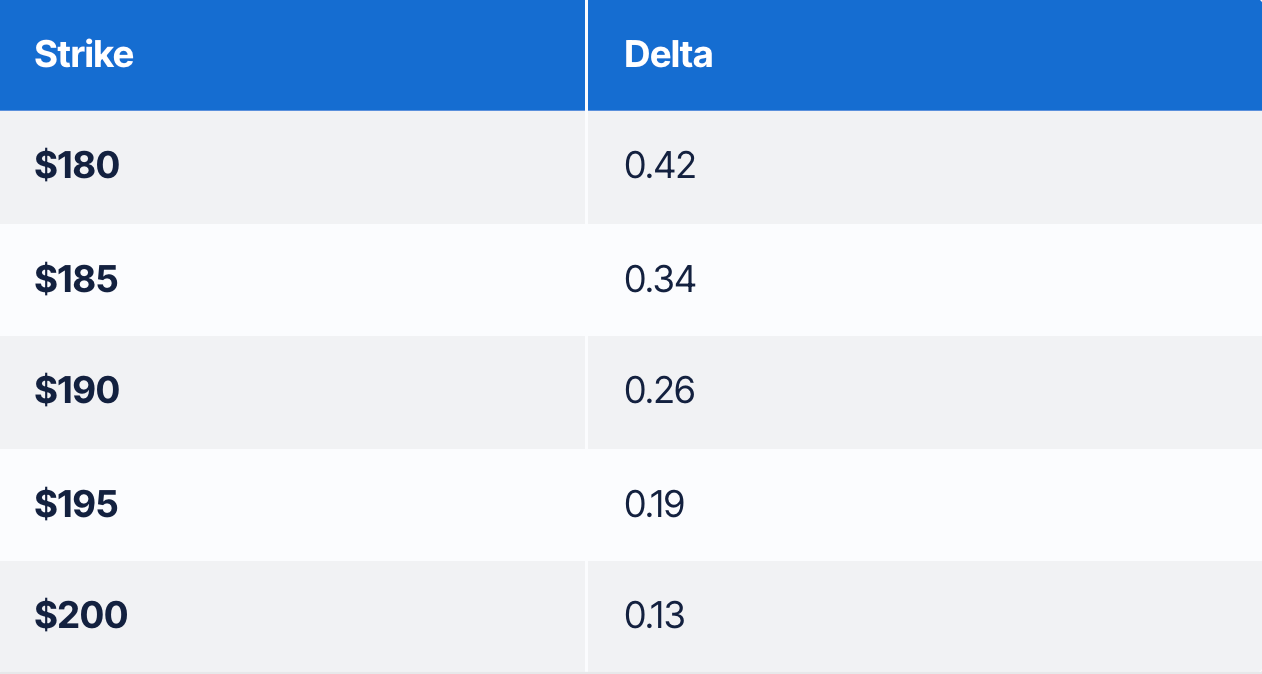
$180 and $185 are above your range.
$200 is below.
Cross them out.
That leaves $190 (0.26) and $195 (0.19 — just under, but close enough to consider).
Step 2: ATR Buffer
XYZ’s 14-day ATR is $5.20.
Buffer (1.5x): $7.80
Minimum strike: $175 + $7.80 = $182.80
Both $190 and $195 are above $182.80. They pass the ATR check.
Step 3: Yield Check
The expiration is 32 days out.
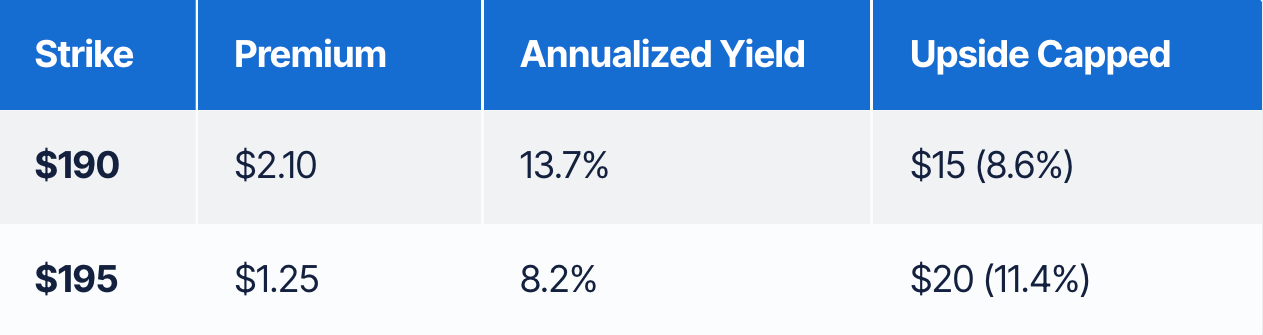
The $190 strike pays better, but caps your gains earlier.
The $195 strike pays less, but lets the stock run further before assignment.
Both are reasonable.
It depends on whether you’d rather have more income now or more room to participate in upside.
Step 4: Event Scan
Earnings: 47 days away. Clear.
Ex-dividend: 22 days away — inside your contract.
You check the delta on both strikes.
The $190 is 0.26, the $195 is 0.19.
Neither is in the money, so an early assignment for the dividend is unlikely.
But worth noting.
Fed meeting: 18 days away.
XYZ isn’t rate-sensitive.
Low concern.
No red flags. You proceed.
Step 5: Liquidity Check
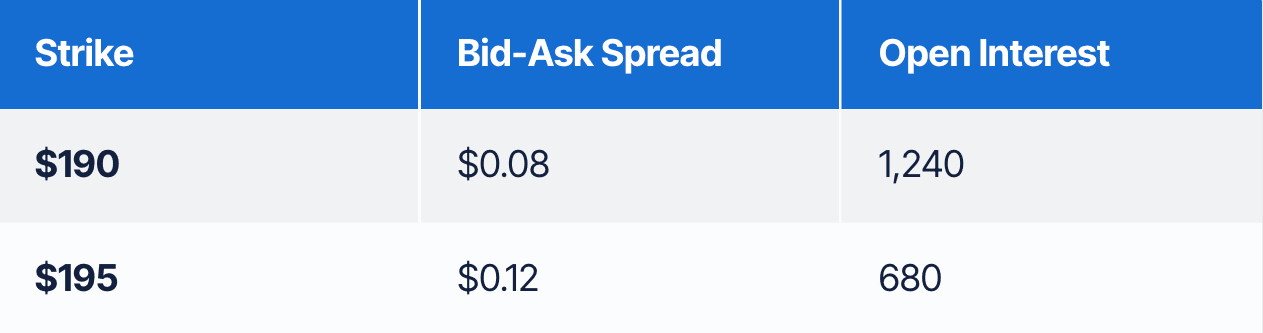
Both are liquid enough. Spreads are tight. No issue.
Decision:
Two clean choices:
— $190 strike: Higher yield, tighter cap. Good if you’re okay selling at $190.
— $195 strike: Lower yield, more room. Good if you want to ride more upside.
You decide you’d be happy selling at $190 - that’s a solid gain from your $175 cost basis, plus you keep the premium.
You sell the $190 call at $2.10.
You know why you picked it, what you’re giving up, and what to watch.
The Covered Call Strike Selection Checklist
Print this out. Use it every time you sell a call.
